After you transform a form to a page, you may encounter problems with labels that are not transformed correctly or are different than you expect. This issue occurs when labels on a form do not comply with the label control mapping rules in the form transformation tool. For more information about label control mapping rules, see the Label Control section of Control Mapping Rules.
You can resolve these problems by modifying the labels on the form and retransforming the form to a page.
Labels are transformed in the following cases:
-
The label has a parent control.
-
The label does not have a parent control but is positioned next to another control, such as a text box or a check box. The Xpos of the control must be within 220 pixels of the end of the label (Xpos + Width). The Ypos of the control must be within 25 pixels of the label.
-
The label does not have a parent control but is the header of a group of indented controls, such as labels, text boxes, or check boxes. The Xpos of the controls must be indented at least 110 pixels and no more than 330 pixels from the Xpos of the label. The distance between the Ypos of the header and the first indented control or between two indented controls is no more than 660 pixels.
-
The label does not have a parent control but is used as instructional text. The instructional text is specified in the MoveElements.xml transformation input file.
The following sections describe how to troubleshoot different label scenarios.
To complete this procedure, you will need:
-
Microsoft Dynamics NAV 2009 with a developer license.
-
All Microsoft Dynamics NAV 2009 requirements. For more information, see Microsoft Dynamics NAV 2009 SP1 Requirements.
Label Adjacent to a Control
If a label does not have a parent control other than the container control but is positioned near another control, then the label is transformed correctly. However, if the label is more than 220 pixels from the control, then the label is not connected to another control after it is transformed. The transformed label is a stand-alone control.
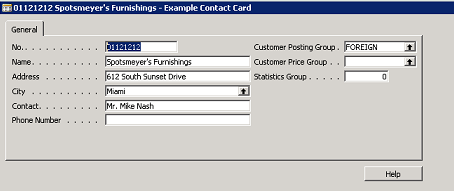
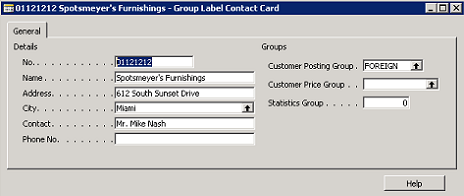
The following illustration shows a form with several text boxes and labels. The customer number (No.) label has the following properties:
-
ParentControl = Tab control (container control)
-
Xpos = 440
-
Width = 3300
The customer number text box has the following property:
-
Xpos = 3970
If a label does not have a parent control other than the container control, but the following equation is true, then it will be transformed correctly:
Xpos of control <= Xpos of label + width of label + 220
In this example, the Xpos of the control, which is 3970, is not less than or equal to the sum of the Xpos of the label, width of the label, and 220.
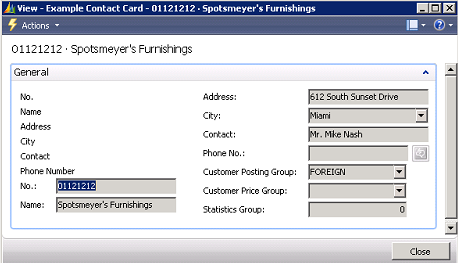
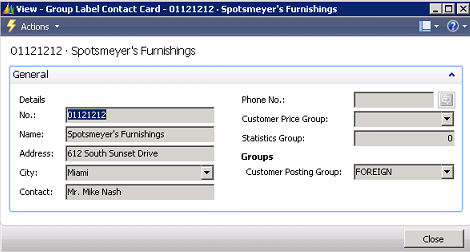
The following illustration shows the resulting page if you transform this form.
The customer number label is not transformed correctly. To resolve this issue, do one of the following:
-
Modify the label on the form so that it is positioned within the acceptable range of pixels from the control and then retransform the form.
-
Modify the label on the form so that its parent control is the text box instead of the tab control and then retransform the form.
To verify and modify labels on a form
-
In the Classic client, on the Tools menu, click Object Designer.
-
In Object Designer, click Form, select the form for which a label was not transformed correctly, and then click Design.
-
In Form Designer, select the label, click the View menu, and then click Properties.
-
Do one or both of the following:
-
In the Label - Properties window, in the ParentControl field, enter the ID of the text box that the label identifies.
 Note
NoteThe CaptionML value of the parent control is used as a label on the transformed page. If the label has a CaptionML value, then that value is transferred to the CaptionML value of the parent control during transformation and then used as a label on the transformed page.
-
In the Label - Properties window, in the Xpos field, enter a position in pixels so that the label is within 220 pixels of the control. In the Ypos field, enter a position in pixels that is within 25 pixels of the control.
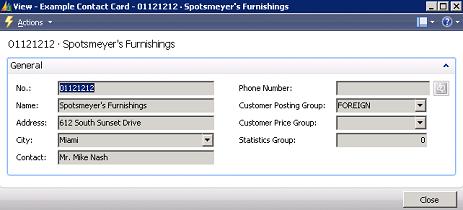
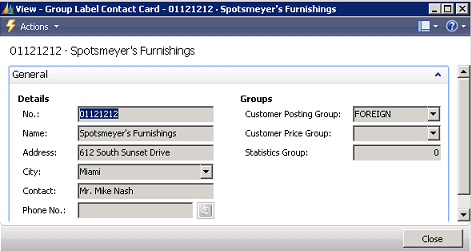
The following illustration shows the transformed page with the label transformed correctly.
-
-
To save and compile your form, close the form in Form Designer. In the Save Changes window, confirm that the Compile check box is selected, and then click Yes.
Group Label
If a label does not have a parent control other than the container control but is the header of a group of indented controls, such as labels, text boxes, or check boxes, then the label is transformed correctly. However, if the controls are indented more than 330 pixels or less than 110 pixels from the label, then the label is not connected to another control after it is transformed. The transformed label is a stand-alone control. Additionally, if the Ypos of the header is more than 660 pixels from the first control in the group, then the label is not connected to another control after the label is transformed. The following illustration shows a form with several text boxes and labels. The Details label that is the header of a group has the following properties:
-
ParentControl = Tab control (container control)
-
Xpos = 440
The labels of the text boxes in the Details group each have the following property:
-
Xpos = 780
The Groups label that is the header of a group has the following properties:
-
ParentControl = Tab control (container control)
-
Ypos = 880
The labels of the text boxes under the Groups label have the following properties:
-
Customer Posting Group Ypos = 1550
-
Customer Price Group Ypos = 2200
-
Statistics Group Ypos = 2850
If a label does not have a parent control other than the container control but is the header of a group of labels and the following equations are true, then it will be transformed correctly:
Xpos of header label + 330 >= Xpos of indented group of labels >= Xpos of header label + 110
Ypos of header label + 660 >= Ypos of first indented group
In this example, the sum of the Xpos of the Details label, which is 440, and 330 is not greater than or equal to the Xpos of the indented group of labels. The sum of the Ypos of the Groups label, which is 880, and 660 is not greater than or equal to the Ypos of the first indented group.
The following illustration shows the resulting page if you transform this form.
The group header labels are not transformed correctly. To resolve this issue, modify the labels on the form so that they are positioned within the acceptable range of pixels from the group header label, and then retransform the form.
To verify and modify group labels on a form
-
In the Classic client, on the Tools menu, click Object Designer.
-
In Object Designer, click Form, select the form for which a label was not transformed correctly, and then click Design.
-
If the group header label does not have a parent control but is the header of a group of indented controls, then verify that the label is positioned near the indented controls by performing the following steps:
-
In Form Designer, select the label, click the View menu, and then click Properties.
-
In the Label - Properties window, note the values in the Xpos and Ypos fields.
-
In Form Designer, for each indented control, select the control, click the View menu, and then click Properties.
-
In the Properties window of the control, verify that the value in the Xpos field is less than or equal to the Xpos of the group header label plus 330 and is greater than or equal to the Xpos of the group header label + 110.
-
In the Properties window of the each control, verify that the difference between the values in the Ypos field of two labels is less than or equal to 660.
The following illustration shows the transformed page with the label transformed correctly.
-
-
To save and compile your form, close the form in Form Designer. In the Save Changes window, confirm that the Compile check box is selected, and then click Yes.
Instructional Text
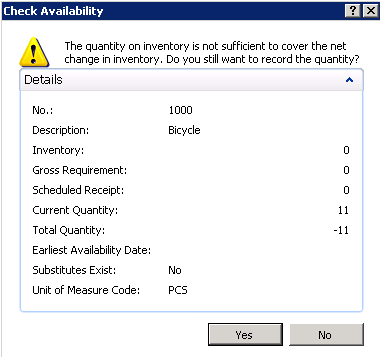
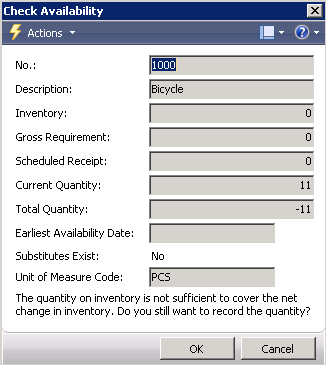
If a label does not have a parent control other than the container control but is marked as instructional text, then the label is transformed and placed at the top of the page. However, if it is not marked as instructional text in the transformation input file, then it is not placed at the top of the page after it is transformed. The following illustration shows a page with instructional text that was not marked as instructional text and is displayed at the bottom of the page instead of at the top.
To display the instructional text at the top of the page, modify the transformation input file by setting the Instructional TextML property on the label.
To verify and modify instructional text labels on a form
-
In the Classic client, on the Tools menu, click Object Designer.
-
In Object Designer, click Form, select the form for which a label was not transformed correctly, and then click Design.
-
If the label does not have a parent control but is used as instructional text, verify that you have marked the label as instructional text in the transformation input file. For more information, see How to: Mark Labels on Dialogs as Instructions.
-
To save and compile your form, close the form in Form Designer. In the Save Changes window, confirm that the Compile check box is selected, and then click Yes.
The following illustration shows the transformed page with the label that has been transformed correctly.