


In Microsoft Dynamics NAV 2013, you can use a worksheet page type to create two types of pages:
- Worksheet pages - Used to present data in a
list and offer a choice of actions to the user. For example, page
5841, Standard Cost worksheet, in Object Designer is a worksheet
page.
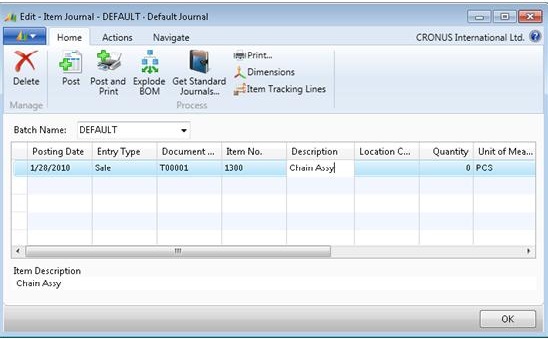
- Journal pages - Used to perform tasks, such
as posting transactions. For example, page 40, the Item Journal, in
Object Designer is a journal page.
The following illustration shows an Item Journal page.
Worksheet pages always open in edit mode and can display lists of data in a grid control and in lines. Lines can be filled in by a user or by running a batch job. You can add other controls such as a filter or FactBox to a worksheet page but you cannot add a chart pane. As part of user personalization options, these controls can be added or removed by the user. Actions can be added to the navigation of a worksheet page, and may be promoted by the user to the ribbon.
In this walkthrough, you learn how to create a new Item Journal worksheet that displays item journal lines.
 About This Walkthrough
This walkthrough provides on overview of how to create a journal worksheet page and how to add controls to display items from a table. In this walkthrough, you will display items from table 83, Item Journal Line.
This walkthrough illustrates the following tasks:
- Creating a worksheet page.
- Adding a batch name control.
- Adding a field repeater control.
- Adding a fixed layout control.
- Adding FactBoxes.
- Running the page.
Prerequisites
To complete this walkthrough, you will need:
- Microsoft Dynamics NAV 2013 installed with a
developer license.
- The CRONUS International Ltd. demonstration
database installed.
Story
Simon is a partner working for CRONUS International Ltd. Susan, the order processor asks Simon to create an Item Journal worksheet page for her, which she can use to keep her item inventory up to date. Susan often uses the posting action on the Item Journal page to adjust her inventory in relation to purchases and sales.
Creating a Worksheet Page
 Note Note |
|---|
| In this walkthrough, you will create a worksheet page from a blank page and learn about the properties and controls of a worksheet page. If you are using Microsoft Dynamics NAV 2013, Object Designer includes a wizard that you can use to create a worksheet page that sets up many properties and controls for you. For more information about the wizard, see How to: Create a Page. |
To create a worksheet page
-
In Microsoft Dynamics NAV Development Environment, on the Tools menu, choose Object Designer.
-
In Object Designer, choose Page, and then choose New. The New Page window opens.
-
In the Table text box, choose the up arrow, select the table 83, Item Journal Line, and then choose the OK button.
-
Select Create blank page, and then choose the OK button.
The new page appears in Page Designer.
-
On the first row, ensure that the Type column is set to Container and that the SubType column is set to ContentArea. In the Name column, type Susan's Item Journal.
-
Select a blank row, and on the View menu, choose Properties.
-
In the PageType property, set the page type to Worksheet.
-
Close the Properties window.
Adding a Batch Name Control
First, Simon needs to add a batch name control to the top of his worksheet page, so Susan can select which batch item she wants to run from the Item Journal Batch table.
To add a batch name control
-
In Page Designer, select the second row, type CurrentJnlBatchName in the Name field, and set Type to Field. This element is automatically indented one space below your Container element.
-
With the second row still selected, open the Properties window, and set the SourceExpr property to CurrentJnlBatchName.
-
Set the LookUp property to Yes.
-
On the View menu, choose C/AL Globals.
-
In the Name field, enter CurrentJnlBatchName, then in the DataType field, choose Text, and then close the C/AL Globals window.
-
Save your new page and name it Susan's Item Journal. Set the page ID to 50007 or another value in the 50000 range.
Adding a Field Repeater Control
Next, Simon must add fields to Susan's Item Journal page. In a worksheet page these fields are displayed horizontally, like lines.
To add field repeater controls
-
In Page Designer for the page you just created, select a blank row. Set the Type column to Group and the SubType column to Repeater, and accept the default for the name. You can enter a name for control instead of accepting the default.
-
In the next blank row, set Type to Field. You cannot set a SubType when you select Field.
-
With the new Field row selected, on the View menu, choose Field Menu. The Field Menu window displays fields available from table 83, Item Journal Line.
-
Select multiple fields from this table by holding down the Ctrl key while you make your selection. For this walkthrough select the following fields:
- Item No.
- Posting Date
- Document Date
- Entry Type
- Document No.
- Description
- Variant Code
- External Document No.
- Item No.
-
Choose the OK button to add the fields and then choose Yes in the dialog box that appears.
You have now successfully added a Repeater control to your worksheet page.
-
Close Page Designer and save your changes.
Adding Fixed Layout Controls
Next, Simon needs to create a Fixed Layout control. On an Item Journal page, this type of control can be used to show a description at the bottom of the page for the item displayed in the batch line.
To add a fixed layout control
-
Select page 50007, Susan's Item Journal and choose Design to open it in Page Designer, if it's not already open.
-
In the next available row below the repeater controls, set Type to Group and SubType to Group. Use the arrows provided in Page Designer to move this row to the left one space. The fixed layout control should be indented at the same level as your Repeater control.
-
On the next row, set Type to Group and SubType to FixedLayout.
-
In the next available row, set Type to Group and SubType to Group.
-
Finally, in the next available row, set Type to Field. Type Item Description in the Name field and accept the default indentation as you add these elements to the page.
-
Save and preview your page. You can now see that Item Description is displayed at the bottom of your worksheet page.
NoteTo link Item Description to Batch Lines you must add the variable Item Description to C/AL Globals in Object Designer.
Adding FactBoxes
Simon has decided to add three FactBoxes to Susan's worksheet page:
- Item Replenishment
- RecordLinks
- Notes
Item Replenishment is a FactBox in an existing page, while RecordLinks and Notes are both system FactBoxes. Simon wants all these FactBoxes to be hidden unless Susan decides to show them as part of her personalization options.
To add FactBoxes to a worksheet page
-
Select page 50007, Susan's Item Journal and choose Design to open it in Page Designer.
-
In the first available empty row, set Type to Container and SubType to FactBoxArea. Accept the default value in the Name column.
-
Use the left indentation arrow to negative indent the FactBox control until it has zero indention and matches the top level ContentArea container element.
-
In the next row, set Type to Part, and accept all other default values in this row.
-
With the same row selected, on the View menu, choose Properties. In the PagePartID property, choose the up arrow and select the Item Replenishment FactBox (9090) page from the Page List window.
-
Set the Visible property to FALSE. This FactBox remains hidden until the user adds it to the page.
-
Close the Properties window.
-
In the next available empty row, add another Part for the RecordLinks system FactBox.
-
From the View menu, select Properties.
-
In the Properties window, set the following properties.
Property Value SystemPartID
RecordLinks
PartType
System
Visible
FALSE
-
In the next available empty row in Page Designer, add another Part for the Notes system FactBox.
-
Select the row, and open the Properties window.
-
In the Properties window, set the following properties.
Property Value SystemPartID
Notes
PartType
System
Visible
FALSE
-
Go to the next available empty row in Page Designer, and open the Properties window if it is not already open.
-
Locate the DelayedInsert property and choose Yes.
-
Close the Properties window.
-
Check the indentation of your page elements and adjust if necessary.
-
The following illustration shows the indentation of elements on the worksheet page after adding FactBoxes.
Running the Page
You will now test your new worksheet page in the Microsoft Dynamics NAV Windows client.
To run the page
-
In Object Designer, select the page Susan’s Item Journal, page 50007, and then choose Run.
The Microsoft Dynamics NAV Windows client opens and displays the new worksheet page. Notice that no FactBoxes are displayed.
-
From the main menu, select Customize, then choose Choose FactBoxes. The Customize Action Tab window opens.
-
In Available FactBoxes, select the Item Details-Replenishment FactBox, and choose Add
-
Use the same procedure to add the RecordLinks and Notes FactBoxes. Choose the OK button, and then run the page again. Notice that the hidden FactBoxes you added are now displayed on the page.
Next Steps
Simon has now created a basic worksheet page. He must remember to add the variables, constants, and functions necessary to make the worksheet page function correctly. He knows that he add variables, constants and functions in the C/AL Globals or C/AL Locals window. For information about C/AL Globals window, see C/AL Globals. For information about C/AL functions, see C/AL Functions.
For more information about adding variables, constants, and functions, see Codeunits.