


In Microsoft Dynamics NAV you can use the Navigate page type to create a wizard page. A wizard page consists of a number of user input screens or steps linked together, enabling users to carry out infrequently performed tasks, such as configuration or specific business tasks.
In Microsoft Dynamics NAV, examples of wizard pages include:
- Create Interaction, page 5077
- Create To-do, page 5097
- Create Opportunity, page 5126
In Microsoft Dynamics NAV, Benjamin, the marketing manager, wants to find an easy way to create To-dos for his salespeople. By using the Navigate page type you can make this task easier for him by breaking it down into smaller, more manageable steps.
 Note Note |
|---|
| In Microsoft Dynamics NAV, the Navigate page type is also used for page 344, Navigate. |
 About This Walkthrough
This walkthrough provides an overview of how to create the basic elements in a To-do wizard page using Page Designer.
This walkthrough illustrates the following tasks:
- Creating a wizard page.
- Adding steps to a wizard page.
- Adding the attendee subpage.
- Adding wizard buttons.
- Running the page.
Prerequisites
To complete this walkthrough, you will need:
- Microsoft Dynamics NAV 2013 installed with a
developer license.
- The CRONUS International Ltd. demonstration
database installed.
Story
Simon is a partner working for CRONUS International Ltd. Benjamin, the marketing manager at CRONUS, wants Simon to create a wizard page that will enable him to create To-dos for his team of salespeople. Simon must create a wizard page that makes it easy to link a To-do with a sales campaign or sales opportunity. Simon knows that he can do this successfully if he uses the Navigate page type to create a To-do wizard.
Creating a Wizard Page
Simon must first create a new wizard page in Page Designer.
| Note |
|---|
| In this walkthrough, to learn about the properties and controls of a wizard page, you will create a wizard page from a blank page. If you are running Microsoft Dynamics NAV 2013, Object Designer also includes a wizard that you can use to create a wizard page that sets up many properties and controls for you. For more information about the wizard, see How to: Create a Page. |
To create a wizard page
-
In the Microsoft Dynamics NAV 2013 Development Environment, on the Tools menu, choose Object Designer.
-
In Object Designer, choose Page, and then choose New. The New Page window opens.
-
In the Table text box, choose the up arrow, select the table 5080, To-do, and then choose the OK button.
-
Choose Create blank page, and then choose the OK button.
The new page appears in Page Designer.
-
On the first row, ensure that the Type column is set to Container and that the SubType column is set to ContentArea. In the Name column, type Ben's To-dos.
-
Select a blank row, and on the View menu, choose Properties.
-
In the PageType property, set the Value field to NavigatePage.
-
Close the Properties window.
-
Close the Page Designer window.
-
In the Save As dialog box, in the Name text box, enter Ben's To-dos and enter a page ID, for example, 50015. Choose the OK button.
You have successfully created and saved a Navigate page, which you will use to create a To-do wizard. Next you must add steps to the wizard.
Adding Steps to a Wizard Page
In a wizard page, steps are controls that you place on a Navigate page to enable it to work like a wizard. These controls initially appear as tabs in the content area of the page. Simon can create steps in Page Designer by adding a different group element for each step that he wants to create. Each control is displayed as a separate step to the user. The following procedure shows how to create the first step in a To-do wizard that has four steps.
To add steps to a wizard page
-
In Page Designer, select your new Ben’s To-do wizard page, 50015, and choose Design to open it.
-
On the second row, in the Name column, type Step1. Set Type to Group and SubType to Group.
-
In the next empty row, leave the Name field blank and set Type to Field.
-
On the View menu, choose Field Menu.
In the Field Menu window, select fields from the table 5080, To-do.
-
Make your selection by holding down the Ctrl key while you select the following fields:
- Type
- Date
- Description
- Start time
- Ending Date
- Ending Time
- Duration
- All Day Event
- Team To-do
- Type
-
Choose the OK button. A message box displays the following message, "Do you want to add the fields that are selected in the field menu?" Choose Yes.
-
In the Caption column for each of the fields you added, type the following captions:
Field Caption Type
What is the type of the to-do?
Date
What is the starting date of the to-do?
Description
Describe your to-do
Start time
What is the start time of the to-do?
Duration
What is the duration of the to-do?
Team To-do
Team to-do
All Day Event
All Day Event
Ending Date
What is the end date of the to-do?
Ending Time
What is the end time of the to-do?
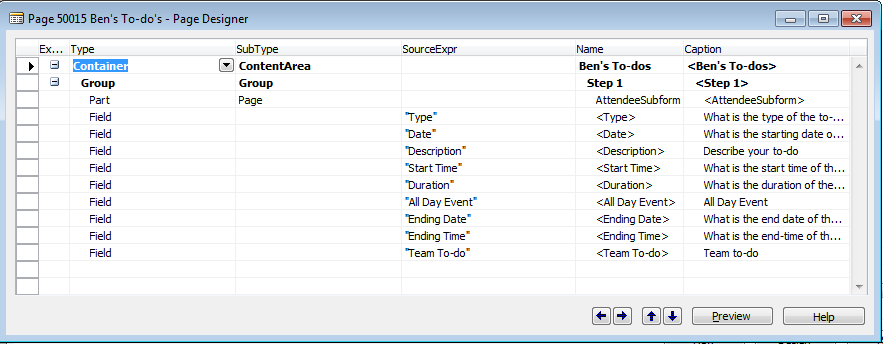
All the fields that you add must be indented one space below Step 1. Remember to check indentation on all elements that you create, and adjust with the left and right arrows if necessary.
-
When you have added all the necessary steps, close the Page Designer, and save your page.
In the Microsoft Dynamics NAV Windows client, each step is displayed like a tab control until you add Back, Next, and Finish buttons to the lower part of the page. You will read about this in Adding Wizard Buttons.
Adding the Attendee Subform
When Ben opens his new wizard page for the first time, he wants to be able to choose a salesperson to create a To-do for. Simon must add a control to Step 1 of the wizard, which allows him to select attendees from table 5080, Attendees.
To add the attendee subform
-
In Object Designer, select your new wizard page, 50015, and choose Design to open it.
-
Insert a row right below the Step1 row.
-
Type AttendeeSubForm in the Name column. This row should be indented to match the other field elements in the Step 1 group. Set Type to Part.
-
On the View menu, choose Properties. Set the PagePartID property to Attendee Wizard Subform (5198). This will ensure that Ben can select attendees for his To-dos in the first step of the wizard.
-
Close the Properties window, save your page, and in Page Designer, choose Preview to view your changes in the Microsoft Dynamics NAV Windows client and then close the Preview window.
The following illustration shows the indentation of elements on the wizard page after adding steps and the attendee subform.
Adding Wizard Buttons
Simon has now successfully created a basic wizard page. To make his page appear more like a wizard he must add Next, Back, and Finish buttons. To do this, Simon must add a new set of actions to his wizard page using the Action Designer.
To add wizard buttons
-
In Page Designer, select your To-to wizard page, 50015, and choose Design to open it.
-
Select the first empty row below the steps that you have already created, and on the View menu, choose Control Actions to open Action Designer.
-
On the first empty row in Action Designer, set Type to ActionContainer and SubType to ActionItems.
-
In the next available row, type Back in the Name field, and set Type to Action. Do the same in the next two available rows except enter Next and Finish in the Name fields.
-
When you have added all the buttons you need, select the row with the Back button control, and open the Properties window.
-
In the Properties window, set the following properties on the Back button.
Property Value Enabled
BackEnable
For the Next button, set NextEnable
For the Finish button, set FinishEnable
Visible
True
Caption
&Back
For the Next button, set &Next
For the Finish button, set &Finish
RunPageMode
Edit
InFooterBar
Yes
-
On the View menu, choose C/AL Globals, and on the Variables tab, declare the following variables:
Variable DataType BackEnable
Boolean
NextEnable
Boolean
FinishEnable
Boolean
-
To make sure the controls are visible on the page, from the Action Designer window, open the C/AL Code window.
-
In the OnAction() trigger for Back, enter the following line of code
CurrPage.UPDATE(TRUE); -
Repeat this for the OnAction() triggers for Next and Finish.
-
Close the C/AL Code window.
-
Save and compile your page.
To enable the wizard buttons
-
In Page Designer, select your To-to wizard page, 50015, and choose Design to open it.
-
On the View menu, choose C/AL Globals, and on the Functions tab, create a new function named DoStep.
-
Choose the Locals button, and on the Parameters tab, enter step in the Name field, and choose DataTypeInteger.
-
Close the C/AL Locals window and the C/AL Globals window.
-
On the View menu, choose C/AL Code, and scroll down until you locate the DoStep function.
-
In the DoStep function, insert the following lines of code:
 Copy Code
BEGIN CASE step OF 0: BEGIN BackEnable := FALSE; NextEnable := TRUE; FinishEnable := FALSE; END; 1: BEGIN BackEnable := TRUE; NextEnable := FALSE; FinishEnable := TRUE; END; 2: BEGIN BackEnable := FALSE; NextEnable := FALSE; FinishEnable := FALSE; END ELSE ERROR('invalid button state/step, choose 0-2'); END; CurrPage.UPDATE(TRUE); END; -
Now scroll to the OnInit function and enter the following line of code:
Copy CodeBEGIN DoStep(0); END;
-
Close the C/AL Code window.
-
Save and compile the page.
Running the Page
Test your new wizard page in the Microsoft Dynamics NAV Windows client.
To run the page
-
In Object Designer, select page Ben's To-dos, and then choose Run.
The Microsoft Dynamics NAV Windows client opens and displays the new wizard page.
Next Steps
Simon has now created a basic wizard page.
For more information about adding variables, constants, and functions, see Codeunits.