


In Microsoft Dynamics NAV 2013, a document page consists of two separate pages, with one page nested inside the other page.
You can create a document page if you have two tables that are linked. For example, page 42, Sales Order, has two source tables: Sales Header and Sales Lines. These two tables are linked in a one-to-many relationship and are source tables for the Sales Order page.
The sales order document page consists of a series of FastTabs that display customer, invoicing, shipping, and other relevant information. The source table for this information is table 36, Sales Header. The lines that show items that are associated with each customer are based on table 37, Sales Lines.
The following illustration shows a document page.
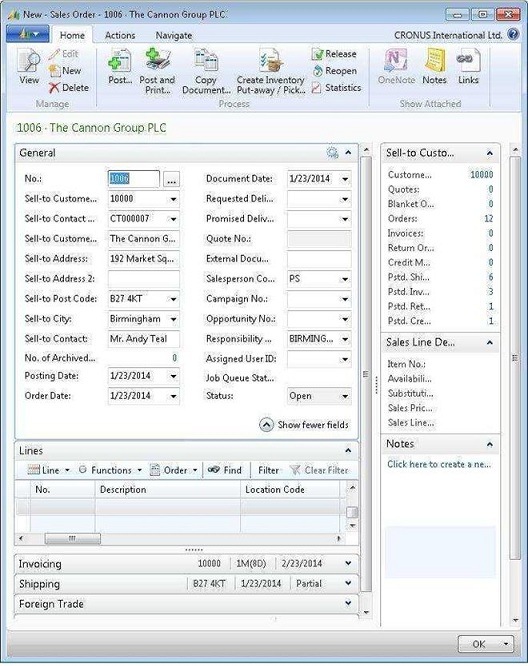
In this walkthrough, you will create a sales order document page. This page will contain useful secondary information, such as customer statistics, in FactBoxes to the right of the main content area. The FactBox is updated every time that you select a line.
 About This Walkthrough
This walkthrough provides an overview of how to create a sales order document page with Page Designer.
The walkthrough illustrates the following tasks:
- Creating a document page
- Adding controls to display fields from the
Sales Header table
- Adding a Part Control to display sales
lines.
- Adding a FactBox that is linked to sales
lines.
- Running the page.
Story
Simon is a partner working for CRONUS International Ltd.. Susan, the order processor, asks Simon to create a sales order page that can display each of her orders and any associated lines. This page is essential to Susan’s daily work, because she uses sales orders to create and track all her customer orders from the creation of the first quote to when the order is shipped. Simon knows that this page must be based on two related source tables and that he must create a page by using the document page type.
Prerequisites
The following prerequisites are required for this walkthrough:
- Microsoft Dynamics NAV 2013 installed with a
developer license.
Creating a Document Page
First, Simon creates a new document page that is based on table 36, Sales Header.
 Note Note |
|---|
| In this walkthrough, you learn about the properties and controls of a document page, and you will create document page from a blank page. If you are using Microsoft Dynamics NAV 2013, Object Designer includes a wizard that you can use to create a document page that will set up many properties and controls for you. For more information about the wizard, see How to: Create a Page. |
To create a document page
-
In the Microsoft Dynamics NAV Development Environment, on the Tools menu, choose Object Designer.
-
In Object Designer, choose Page, and then choose the New button. The New Page dialog box appears.
-
In the Table text box, select the table 36, Sales Header, and then choose the OK button.
-
Select Create blank page, and then choose the OK button.
The new page appears in Page Designer.
-
In the Name field of the first row, which has the type Container and the subtype ContentArea, enter Susan's Sales Order Page.
-
Select a blank row, and on the View menu, choose Properties.
-
Locate the PageType property, and then set the Value field to the page type Document.
-
Close the Properties window.
-
In the next row in Page Designer, in the Name field, enter General.
-
Set the Type property to Group and the SubType property to Group.
-
On the File menu, choose Save. Name your new page Susan's Sales Order Page. Set the ID field to 50006 and choose the OK button.
Adding a Control to Display Fields
from the Sales Header Table
Simon now wants to add fields to his document page. He creates a group named General and adds fields from the Sales Header table. He knows that the main content area on a document page displays fields as FastTabs in the Microsoft Dynamics NAV Windows client.
To add a control to display fields from the Sales Header table
-
In Page Designer, select the next empty row below the General group and set the Type property to Field.
-
Select the row, and on the View menu, choose Field Menu. The Field Menu displays all the fields that are available in the Sales Header table.
-
Press the Ctrl key and select the following rows:
- Sell-to Customer No.
- No.
- Sell-to Customer Name
- Sell-to Address
- Sell-to Address 2
- Sell-to City
- Sell-to Contact
- Sell-to Customer No.
-
Choose the OK button, and then choose Yes in the dialog box to add the fields to your page.
NoteIf the OK and Cancel buttons are unavailable, see Page Designer Troubleshooting for more information. -
On the File menu, choose Save.
-
In the Save dialog box, make sure Compiled is selected, and then choose the OK button.
Adding a Part Control to Display
Sales Lines
Simon's next task is to add a nested control to display lines from the Sales Lines table and the Sales Order Subform page. To do this, he must add a Part control to his page and link both objects by using the Properties window.
To add a part control to display sales lines
-
In Page Designer, select the next empty row below the General group and set the Type property to Part.
-
In the Name field, enter Sales Lines. Place the cursor anywhere outside this field, and Caption will be filled in automatically.
-
Select the Sales Lines row, and on the View menu, choose Properties.
You will set the following properties to configure a link to the Sales Lines table and page 46, Sales Order Subform:
- PagePartID
- SubPageLink
- PagePartID
-
Locate the PagePartID property, in the Properties window, and use the drop-down arrow next to this property to display the page list.
-
In the Page List window, select page 46, Sales Order Subform, and then choose the OK button.
-
Locate the SubPageLink property and select the drop-down arrow to open the Table Filter window.
-
In the first row, choose Field to open the Sales Line - Field List window. This window lets you to set a table filter on the Sales Lines table.
-
Select Document No. and then choose the OK button.
-
In the Type drop-down list box, choose FIELD.
-
In the Value field, select No., and then choose the OK button.
-
In the Table Filter window, choose the OK button to add this filter value to the SubPageLink property.
-
Use the left and right arrows to indent Sales Lines so that it matches the General group element.
Adding a FactBox That Is Linked to
Lines
Simon has already created two FactBoxes for his Sales Order page. He now wants to link the Sales Line FactBox to the Sales Lines table on his document page. To do this, he must change the ProviderID property on his FactBox part after he has added it to the page.
To add a FactBox that is linked to lines
-
In Page Designer, select the next empty row.
-
Set the Type field to Container, and then set the SubType field to FactBoxArea. Accept the default values for the Name and Caption fields.
-
In the next row, enter SalesLineFactBox in the Name field, and then set the Type field to Part.
-
On the View menu, choose Properties.
-
In the Properties window, select the PagePartID property, and then choose the field. Select page 9087, Sales Lines FactBox, from the Page List window, and then choose the OK button.
-
To create a link between the FactBox and Sales Lines, you must first find the ID property of the Sales Lines row. To do this, select the Sales Lines row, and view the Properties window. In this example, the ID property of the Sales Lines row is 10.
-
Select the SalesLineFactBox and set the ProviderID property to 10.
NoteThe ID property of the Sales Lines row can vary, so check this carefully. -
In the SubPageLink property, enter the following table filter.
Document Type=FIELD(Document Type),Document No.=FIELD(Document No.),Line No.=FIELD(Line No.) -
Close the Properties window.
-
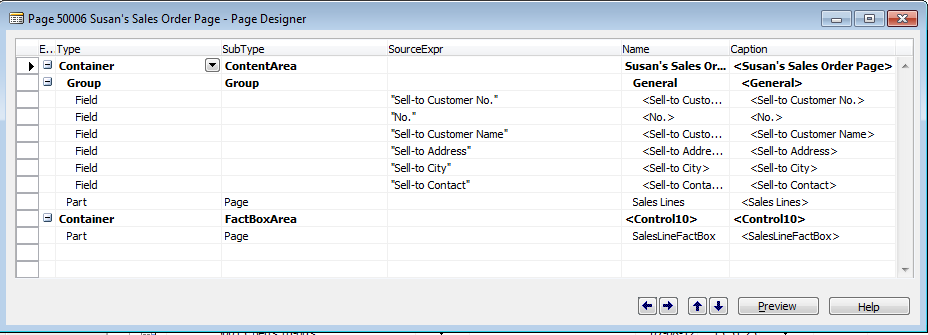
Check the indentation on your FactBox. Indentation of your FactBox container should match the first element in the page so that there is no indentation. Your SalesLineFactBox part should be indented by one space below the FactBox container.
The illustration shows a Page Designer.
-
Close Page Designer, and then choose Yes to save your page.
Running the Page
Test your new document page in the Microsoft Dynamics NAV Windows client.
To run the page
-
In Object Designer, select Susan’s Sales Order Page (50006) and then choose the Run button.
-
Alternatively, you can run the page by using the task bar. On the taskbar, choose Start, and then choose the Run button.
-
Enter the following command to display your page:
DynamicsNav:////runpage?page=<pageid>. In this case pageid is 50006
The Microsoft Dynamics NAV Windows client opens and displays the new document page.
Next Steps
Simon now wants to add actions to Susan's document page and promote some of these actions to the ribbon. For more information, see How to: Promote Actions to the Ribbon on Pages.