
In this walkthrough, you will learn how to create and modify a client report definition (RDLC) report layout for a Customer - Order Summary report.
The Customer - Order Summary report is based on the following tables:
-
Customer
-
Sales Line
To create an RDLC report layout with the same functionality that you have in the Classic client report layout, you must perform some manual steps. These manual steps add data and improve the layout of the report.
 About This Walkthrough
This walkthrough provides an overview of how to create and modify an RDLC layout for a Customer - Order Summary report. This walkthrough illustrates the following tasks:
-
Using the create layout suggestion function to suggest an RDLC layout for the report.
-
Manually modifying the RDLC report layout.
-
Saving the layout and compiling the report.
-
Transforming the report request form using the form transformation tool.
Prerequisites
To complete this walkthrough, you will need:
-
Microsoft Dynamics NAV 2009 installed with a developer license.
-
All Microsoft Dynamics NAV 2009 requirements met. For more information, see Microsoft Dynamics NAV 2009 SP1 Requirements in the Microsoft Dynamics NAV 2009 Installation and Configuration Help.
-
Microsoft Visual Web Developer or Visual Studio installed. For more information, see the Requirements for Additional Features and Options section of Classic Client Requirements in the Microsoft Dynamics NAV 2009 Installation and Configuration Help.
-
Basic knowledge of Visual Studio Report Designer. For more information, see Report Designer (Visual Studio).
Story
Simon is a Microsoft Certified Partner working for CRONUS International. He has been asked to create an RDLC layout for the Customer - Order Summary report that CRONUS currently uses with the Classic client.
Creating the Suggested Transform
Layout
The create layout suggestion function automatically suggests a report layout. Use the following procedure to create the suggested layout and view it in Visual Studio.
To create the suggested transform layout
-
In the Classic client, on the Tools menu, click Object Designer.
-
In Object Designer, click Report, select Report 107, Customer - Order Summary, and then click Design.
-
On the Tools menu, click Create Layout Suggestion. A suggestion for an RDLC report layout is created.
The following illustration shows the RDLC report layout for report 107, Customer - Order Summary, after you create the suggested layout but before you perform any manual modifications.
Modifying the Customer - Order
Summary Report RDLC Layout
The RDLC report layout for the Customer - Order Summary report that is created by using the create layout suggestion function does not contain all the lines that you want to view in the report. You must make some modifications to the report layout.
To move header fields out of the table
-
In Visual Studio, in the Body of the report.rdlc file, move the table down in the layout to provide space for two fields above the table.
-
Select the First(Fields!Outstanding_OrdersCaption.Value) field, right-click the field, and then click Cut.
-
Right-click the area above the table and then click Paste to paste the First(Fields!Outstanding_OrdersCaption.Value) value in a text box above the table.
-
Select the First(Fields!EmptyString.Value) field, right-click, and then select Cut.
-
Right-click the area above the table, just below the text box that was created in step 3, and then click Paste to paste the First(Fields!EmptyString.Value) value in a text box.
-
Select the first two rows of the table from which you cut fields. Right-click the row handle of the two rows, and then select Delete Rows.
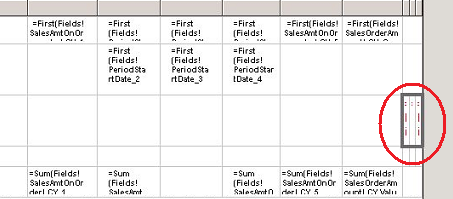
The suggested layout that is created automatically contains some fields that you must move. The first field is the SalesAmtOnOrderLCY_3_.Value field, which is in the wrong location after the transformation. The second set of fields is three hidden fields that can cause problems in the printed layout of the report.
To update the layout
-
In Visual Studio, on the last row of the table, right-click the field with the value =Sum(Fields!SalesAmtOnOrderLCY_3_.Value), and then click Cut.
-
Right-click the empty field in the last row of the table that is between the =Sum(Fields!SalesAmtOnOrderLCY_2_.Value) and =Sum(Fields!SalesAmtOnOrderLCY_4_.Value) fields, and then click Paste.
-
Expand the third row of the table.
-
Decrease the width of the third column of the table.
-
Select the three hidden fields on the third row of the table. These hidden fields are in the rightmost columns of the table. The values in the hidden fields are the following:
-
=Fields!COMPANYNAME.Value
-
=Fields!Customer__Order_SummaryCaption.Value
-
=Fields!CurrReport_PAGENOCaption.Value
-
-
Right-click the three hidden fields, and then click Cut.
-
Right-click the empty field in the first column of the second row of the table, and then click Paste to paste the three fields.
 Note
NoteWe recommend that you move these hidden fields from the right of the table in all reports for which you create an RDLC report layout. Even though the fields are hidden, white space is still allocated on the page for the fields. In some cases, this causes problems with the print layout because of the width of the paper and the width of the table.
-
Select the last three columns of the table from which you cut the hidden fields. Right-click the three columns, and then click Delete Columns.
The next step is to add detail lines and add data to those lines in the table so that the same information that was in the Classic client report layout is in the RDLC report layout.
To add data to detail lines
-
Click in the table to make it active.
-
Right-click the blank detail row, and then click Insert Row Below.
-
Add the following values to the first blank detail line:
-
Customer_No_
-
Customer_Name
-
Leave the third column blank.
-
SalesAmtOnOrderLCY_1_Control31
-
SalesAmtOnOrderLCY_2_Control32
-
SalesAmtOnOrderLCY_3_Control33
-
SalesAmtOnOrderLCY_4_Control34
-
SalesAmtOnOrderLCY_5_Control35
-
SalesOrderAmountLCY_Control36
To add these values, do the following:
-
Right-click the field of the detail line, and then click Expression.
-
In the Expression window, under Category, select Fields (DataSet_Result). Under Field, double-click the value from the previous list. An expression is added to the text box.
-
For each amount value, the data that is shown must be the sum of the lines in the dataset. To create the sum, change the expression to Sum(<expression>). For example, change =Fields!SalesAmtOnOrderLCY_1_Control31.Value to =Sum(Fields!SalesAmtOnOrderLCY_1_Control31.Value)
-
Click OK.
-
-
For each value, you must modify the font and format. For each amount value, you must format the data by using the formatting that is given in the Classic client. To format the data, do the following:
-
Right-click the field, and then click Properties.
-
In the Textbox Properties window, click the Format tab.
-
If the field is an amount field, under Format code, click the Expression button. In the Expression window, under Category, select Fields (DataSet_Result). Under Fields, select the Format value of the field that you selected. For example, select SalesAmtOnOrderLCY_1_Control31Format.
-
Click OK.
-
In the Textbox Properties window, click the Font tab.
-
Under Size, enter 7pt.
-
-
Add the following values to the second blank detail line:
-
Customer_No_
-
Customer_Name
-
Sales_Line__Currency_Code_
-
SalesAmtOnOrder_1_
-
SalesAmtOnOrder_2_
-
SalesAmtOnOrder_3_
-
SalesAmtOnOrder_4_
-
SalesAmtOnOrder_5_
-
SalesOrderAmount
To add these values and format the fields, repeat steps 3 and 4 with the preceding fields.
-
-
To get the sum of the lines in the dataset per customer, you must add a grouping property. To add the grouping property for each of the two detail rows that you added, do the following:
-
Select the row.
-
In the View menu, click Properties Window.
-
In the Properties window, expand Data, and then select Grouping.
-
In the Grouping and Sorting Properties window, in the Name field, enter Table1_Details_Group1.
-
Under Group on, select a line to add an expression. From the drop-down list, select Fields!Customer_No_.Value, and then click OK.

-
-
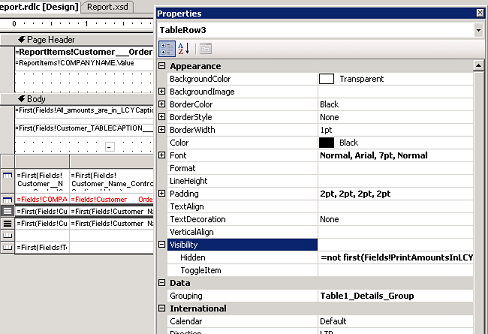
The request form for this report allows you to choose if the values should be displayed in local currency (LCY) or in the company's own currency. The first detail line that you added in step 3 shows the values in the local currency. The second detail line shows the values in the company's currency. To select which values will be printed in the report based on the selection in the request form, you must add a conditional statement to the visibility property. To set the visibility property, do the following:
-
Select the first of the two rows that you added. This row has the LCY values. In the Properties window, expand Visibility. In the drop-down list for Hidden, select <Expression>.
-
In the Expression window, change the expression to the following so that the row is hidden if Fields!PrintAmountsInLCY.Value is not true:
= not first(Fields!PrintAmountsInLCY.Value)
-
Select the second of the two rows that you added. This row does not have the LCY values. In the Properties window, expand Visibility. In the drop-down list for Hidden, select <Expression>.
-
In the Expression window, change the expression to the following:
=first(Fields!PrintAmountsInLCY.Value)
-
-
To show the All Amounts are in LCY caption only when the values are displayed in local currency, do the following:
-
Right-click the field =First(Fields!All_Amounts_are_in_LCYCaption.Value), and then select Properties.
-
In the Textbox Properties window, click the Visibility tab.
-
Under Initial visibility, select Expression, and then enter the following expression in the text box: =not First(Fields!PrintAmountsInLCY.Value)
-
Click OK.
-
-
To show the customer filter caption only when a customer filter is applied, do the following:
-
Right-click the field =First(Fields!Customer_TABLECAPTION__________CustFilter.Value), and then click Properties.
-
In the Textbox Properties window, click the Visibility tab.
-
Under Initial visibility, select Expression, and then enter the following expression in the text box: =First(Fields!CustFilter.Value, "DataSet_Result")= ""
-
Saving the RDLC Report Layout
You must save the RDLC report layout, and you must also save and compile the changes in the Classic client.
To save the report
-
In Visual Studio, on the File menu, click Save report.rdlc.
NoteIf you close the report in Object Designer in the Classic client and then make changes in Visual Studio Report Designer and try to save the RDLC layout, you will get the Save As dialog box instead of the Save dialog box because the temporary Classic client file was removed.
-
Close Visual Studio.
-
In the Classic client, select an empty line in the report in Object Designer.. The following message appears:
The layout of report id: '107' is changed by another application.
Filename of the changed RDLC: <filename>
Do you want to load the changes?
-
Click Yes to load the changes that you made to the RDLC report layout into the Classic client.
-
In the Classic client, on the File menu, click Save.
-
In the Save window, select the Compiled check box, and then click OK.
-
Close the report in Object Designer.
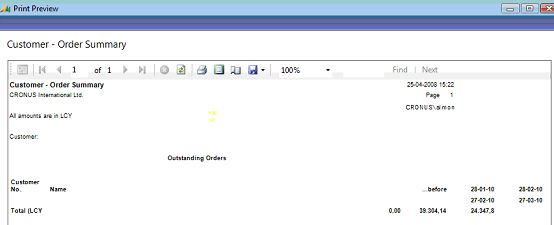
After you complete the preceding procedures, the layout of the report should look like the following illustration.
The report should look like the following illustration.
Transforming the Request Form
In addition to creating an RDLC report layout, you must transform the request form that allows you to select filters for the report. To do this, you use the form transformation tool.
To transform the request form
-
Install the form transformation tool. For more information, see How to: Install the Form Transformation Tool.
-
In the Classic client, on the Tools menu, click Object Designer.
-
In Object Designer, click Report, and then select Report 107, Customer - Order Summary.
-
On the File menu, click Export.
-
In the Export Objects window, enter Report107_Forms.xml for the name of the file. Browse to the folder where the Microsoft.Dynamics.Nav.Tools.FormTransformation.exe file is located, and then click Save.
-
Edit the Microsoft.Dynamics.Nav.Tools.FormTransformation.exe.config file.
-
Change the name of the Forms.xml file to Report107_Forms.xml.
 Copy Code
<add key="FormsFile" value=".\Report107_Forms.xml" />
-
Change the name of the output pages.xml file to Report107_Pages.xml.
Copy Code<add key="PagesFile" value=".\Report107_Pages.xml" />
-
-
Run the form transformation tool. For more information, see How to: Run the Form Transformation Tool.
-
In the Classic client, click Tools, and then click Object Designer.
-
On the File menu, click Import.
-
In the Import Objects window, in the Files of type drop-down list, select XML Format (*.xml), browse to the folder where the Report107_Pages.xml file is located, select Report107_Pages.xml, and then click Open.
-
In Object Designer, click Report, and select report 107.
-
On the Tools menu, click Compile, and then click Yes.
-
To view the RDLC report layout, type the following command at a command prompt:
DynamicsNAV:////runreport?report=107
© 2010 Microsoft Corporation. All rights reserved.