As you run Microsoft Dynamics NAV Setup, you can install one of the predefined component collections, called Installation Options. If you need to modify the set of components included in an existing Installation Option, or create a new set of components, use the Customize the installation pane in Setup to choose components.
Choosing Components to Install
The following procedure describes how to get to that pane and what you can do when you get there.
To identify the components that you want to install
-
In Setup, from the Choose an installation option pane, decide which Installation Option you want to customize, and then click Customize below the name of the Installation Option.
This opens the Customize the installation pane with a selection of components already selected.
An alternative is to click Custom Components on the Choose an installation option pane. This way you open the Customize the installation pane with no components already selected for install.
 Note
NoteTo install Microsoft Dynamics NAV 2009 software to a location other than the default location (C:\Program Files\Microsoft Dynamics NAV\60), click Destination folder on the Customize the installation pane.
-
Select the components that you want to install on the Customize the installation pane.
Options are presented in a tree view.
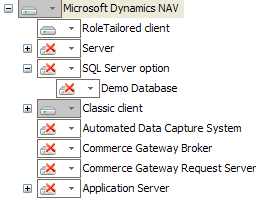
The tree has three levels of hierarchy:
-
The top level shows only a single node, Microsoft Dynamics NAV.
-
The second level shows additional nodes, each identifying a component (RoleTailored client, Server, etc.). Some second-level nodes have a plus sign on the left. Click the plus sign to reveal the third level of the hierarchy.
-
The third level shows subcomponents for the selected second-level component.
Each node has one of three statuses, as indicated by its appearance.
Component node Description 
The component and all its subcomponents are selected for installation.

The component is selected for installation. Some or none (but not all) of the subcomponents are also selected. Only items on the top or second level can be gray (since only these nodes can have subcomponents).

Neither the component nor any of its subcomponents are selected for installation.
-
-
Click on a component to open a menu of options for that component (you must click within the box). The following options are available.
Node option Description Run from My Computer
Select this component for installation.
Run all from my computer
Select this component and all subcomponents for installation.
Not available
Cancel installation of this component and all subcomponents.
For third-level nodes, and second-level nodes with no subcomponents, the only options are Run from My Computer and Not available.
-
After you have selected the set of components and subcomponents that you want to install, click Next to proceed to the Specify parameters pane. Details on this process are in How to: Preconfigure Components.