The matrix box control is not supported by the RoleTailored client. Therefore, to create the same matrix layout and functionality on a transformed page, you must design a new form to replace the original matrix form.
In a matrix form, the table is a matrix box control, which is different from a table box control that has a finite number of rows and columns. A matrix box brings in data from two tables in the database and displays one set of data as lines and one set of data as columns. The matrix box calculates values using the data from the two tables. Each cell in the matrix represents an intersection of the two tables. For example, in form 554, Analysis by Dimensions, the table shows account information and date information from different tables and calculates a value based on the account data on a given date. In the matrix table, you can scroll through an infinite set of dates to view the calculated values.
In the RoleTailored client, because matrix box controls are not supported, you must display the information in a table that has a finite number of columns. To achieve the matrix behavior, you must allow the user to change the columns and filters, and you must refresh the data in the table with each change.
You cannot use the transformation tool to transform a matrix form into a page. Instead, you must create a form to replace the matrix form. The new form has the following characteristics:
-
One or more tabs with the filters from the original form.
-
Controls for selecting the next or previous column.
-
Controls for selecting the next or previous set of columns.
-
Controls for selecting the next or previous period. This is only required if this functionality is on the original form.
-
A table box control that shows the data that is selected by the options, filters, and controls.
If you isolate the matrix table on a subform instead of including a table box on the main form, then you can use the functions in codeunit 9200 to manage the behavior of the new matrix forms. For more information about the content of codeunit 9200, see Codeunit 9200 Matrix Management.
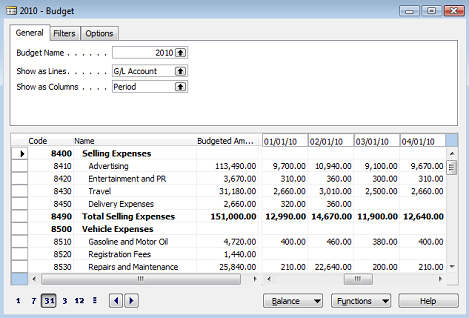
The following illustration shows form 113, Budget, before redesign.
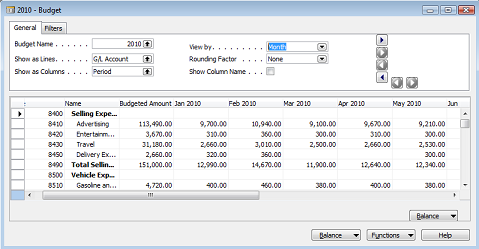
The following illustration shows the redesigned form.
To create the new form
-
On the Tools menu, click Object Designer.
-
In Object Designer, select the form that you want to replace, and then click Design.
-
On the File menu, click Save As to save the form with the new form ID.
-
In Form Designer, select the Matrix Box control, and then on the Edit menu, click Delete.
-
In Form Designer, add a Table Box control. For more information, see How to: Create a Table Box.
-
On the View menu, click Field Menu.
-
In the Field Menu, select the fields that were in the left columns of the original matrix form.
-
Add additional TextBox controls to the table for the additional columns that you want in your new table. These columns replace the matrix columns on the right of the original matrix form.
-
Define two array variables:
-
A Text array variable for the column captions, such as MyColumnCaptions
-
An array variable, typically Decimal, for the calculated values of a line, such as MyColumnValues
-
-
Specify the value of the SourceExpr property of the new TextBox controls as MyColumnValues[ColumnNumber]. Specify the value of the CaptionClass property as '3,'+MyColumnCaptions[ColumnNumber] where ColumnNumber is 1 for the first column, 2 for the second column, and so on. You must add code to the OnAfterGetRecord form trigger to calculate each cell value and column header.
 Note
NoteUse the matrix box on the original form, the C/AL code on that matrix box, and the redesigned matrix forms in the standard application as guidance for creating this table. For more information about the redesigned matrix forms, see Redesigned Matrix Forms.
-
Redesign the code on the form as necessary to ensure that the functionality on the redesigned form works as expected
NoteEach form is different, so you must evaluate the code on each matrix form individually. Use a page or a redesigned form that is similar to the matrix form for guidance when redesigning.
-
On the File menu, click Save.. Confirm that the Compile check box is selected, and then click OK.