Actions are menu items that appear on pages and are grouped under the following three menus:
-
Actions
-
Related Information
-
Reports
In the RoleTailored client, View, Edit, New and Delete are default actions that appear on every page.
You can add additional actions to pages by using Page Designer or by creating additional input when you transform your forms. For example, the Customer List page has the following additional actions:
-
Cash Receipt Journal (on the Actions menu).
-
Prices (on the Related Information menu, point to the Sales submenu).
-
Customer Top 10 List (on the Reports menu).
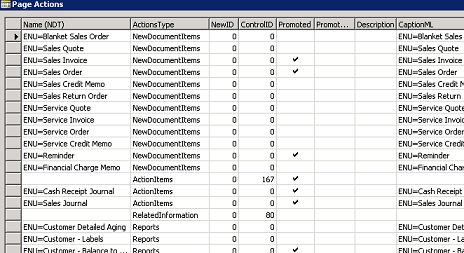
This topic describes how to add an action to a page during form transformation. The following illustration shows the Page Actions window that is part of the TIF Editor, with examples of actions and reports added to form 21, Customer Card.
Before you begin this procedure, you must do the following:
-
Install the Transformation Input File (TIF) Editor. For detailed steps, see How to: Install the Transformation Input File Editor.
-
Add your forms to the TIF Editor, either by importing the transformation input files for the standard application forms, or by using the Get Forms command. For more information, see the following topics:
Adding Actions
To add an action to a page by using the TIF Editor
-
In the Transformation Forms window, select a form to which you want to add an action or report, click Input, point to Add, and then click New and Promoted Actions.
-
In the Page Actions window, in the RunObjectID field of a new line, enter the ID of the page or report that you want to add to the transformed page.
-
In the RunObjectType field, select the object type that you want to add, such as a page or report.
-
In the ActionsType field, select the container on the menu bar in which you want your action to appear. The following table shows the options that you can choose.
Option Description NewDocumentItems
Action will appear in the Action menu under the New Document submenu. If action is also promoted, it will appear in the New section of the Action Pane.
ActionItems
Action will appear in the Actions menu. If action is also promoted, it will appear in the Process section of the Action Pane.
RelatedInformation
Action will appear in the Related Information menu. If action is also promoted, it will appear in the Process section of the Action Pane.
Report
Action will appear in the Reports menu. If action is also promoted, it will appear in the Reports section of the Action Pane.
ActivityButtons
Action will appear on a Role Center page.
-
In the RunFormMode field, specify the mode in which you want your action to open the page. If you select Create, you will create a new item when you click the action, such as a new Sales Order. If you select View, you will be able to view the page or report when you click the action, but you will not be able to edit the data. If you select Edit, you will be able to edit the information on the page when you click the action. If you do not specify the mode, the default mode Edit is used.
-
In the CaptionML field, specify the CaptionML property for the action. The CaptionML property is in the format, ENU=<caption>.
-
(optional) In the RunFormLink field, specify the relationship for linking a field in the page to a field the in the page that the action will run. For example, if from the Customer list you want to create a new sales order for a specific customer and you want the customer number pre-filled when you create the sales order, then you must enter Sell-to Customer No.=FILED(No.) in the RunFormLink field.
-
(optional) In the NewID field, enter the ID that you want the transformation tool to assign to the action on the page. If you do not enter a value, then the tool assigns an ID automatically. For more information, see Transforming Control and Menu IDs.
-
Close the Page Actions window to save your changes.